


Complete Beginners guide to Git, Github, and Opensource
In this article, I have shared a complete beginner’s guide to Git, Github, and Opensource.
At the end of this article, you will understand
- Why Git and GitHub are necessary for the development of software.
- How to use Git and GitHub for your project.
- What open-source software is
- how you can contribute to some Open Source projects.
Let’s get started with the article.
Introduction to Git
Git is a distributed version control system for storing and tracking changes in computer files.
This means that Git allows many developers to work on the same project without being on the same network.
Git is not a programming language as many new developers do assume.
It is only an important tool that every developer should know since its uses will always be found in your entire career as a software developer.
It can be used for programming with Java, c#, c++, JavaScript, Python, PHP, and all other programming languages so it is not language-dependent.
Git is the most widely used version control system in the world.
It is a distributed and actively maintained Opensource project originally developed in 2005 by Linus Torvalds, the famous creator of the Linux operating system kernel.
The key concepts of git
- Coordinate work between multiple developers.
- Revert back changes in committed files or folders.
- Enable developers to work on both local and remote projects.
The benefits of using git
- Keeps track of all committed code histories.
- Takes snapshots of committed files.
- Allows developers to visit any snapshot.
- Allows developers to delete snapshots.
- Allows developers to create branches in projects.
The Important and Basic Git Commands
git init: This command tells git hey I want you to keep track of the files in this folder. it allows us to use the git commands.git add: allows us to add files to the staging area.git rm: allows us to remove files from the staging area.git commit: Allows us to take a snapshot of changes in our files.git status: This command allows us to see the changes that are both tracked and untracked by git and the current branch.git log: This command allows us to see all the commits in git and the current branch.git pull: This command is used to fetch and download content from a remote repository and immediately update the local repository to match that content.git push: is used to upload content from the local repository to the remote repository.git clone: This command is used to point to an existing repo and make a copy of that repo in a new directory in our local machine.git rm: allows us to remove files from the staging area.git branch: allows us to create a branch in our git repository.git checkout: allows us to switch current branches in git.git merge: allows us to merge other branches into the current branch.
N/B: A repository is just another name for a folder that is initialized with git.
N/B: Visit the git documentation for the full git commands.
How To Install Git
Git can be downloaded from the Internet and the best part is it’s free, Git can be installed on a variety of operating systems such as Mac OS X, Windows, and Linux.
To start, you need to download your operating system-specific Git package; we can get the list of downloadable packages from here.
Go ahead and download the latest stable release relevant to your OS, which you can find on the website.
Updating Git via Git
If you already have Git installed, you can get the latest development version via Git itself.
git clone https://github.com/git/git You can also always browse the current contents of the git repository using the web interface.
Getting started with Git on your machine
Before Git can be configured on your machine, you need to create a GitHub account if you don’t have one.
Creating a GitHub account is pretty easy, just get to the GitHub official website and click the signup button, fill in the necessary details, submit, and hurray!!! you get an account with GitHub.
To configure git, type the commands below.
git config --global user.name "your-GitHub-username"
git config --local user.name "your full name"
git config --global user.email "your-email-address"
git config --local user.email "your email id"
Basic commands for the command prompt
touch.
mkdir.
cd.
cd ../
What is GitHub
GitHub is an online platform that allows developers to synchronize their local repositories into the web so that they can be accessed remotely.
It can also be used to browse through other developers’ repositories and download source code or documents without using git.
The most beautiful feature of git is that it allows multiple developers to work remotely on the same project.
What is a repository?
A repository just is a name for a folder that is initialized with git.
In order words, it is a folder in which git keeps track of its data, newly added files or folders, and changes made to the files.
A repository is usually a parent folder containing other folders, nested folders, and files.
It is commonly called a Repo by most developers.
How to create a repository
For each project you work on, you need to create a repository to track changes in it.
There are two ways to create a GitHub repository
- using the command-line interface (CLI).
- using the GitHub official website.
- In this tutorial, I will show you both methods
How to create a Repository via CLI
For each of these commands press the enter key after typing.
cd Desktop
mkdir project1
cd project1
git init
Using the GitHub official website
Step 1
Create a GitHub account or sign in if you already have an account.
Step 2
Click on the plus icon on the top right corner of the website after logging in & Click on the New Repository option.
Enter the information required in the Create a new repository field and click the Create repository button.
we have just created our first repository. That was easy, right?
Adding files and folders to our repository
In the project1 directory, type the following commands:
touch countries.txt

mkdir hello-world

cd hello-world

touch helloWorld.html
We just created a folder and two files in our repo. Go to your desktop and open project1 the folder with your favorite text editor. countries.txt should contain the following:
India
UK
USA
Japan
helloWorld.html file should contain the following:
<!DOCTYPE html>
<html lang="en">
  <head>
    <meta charset="UTF-8" />
    <meta name="viewport" content="width=device-width, initial-scale=1.0" />
    <meta http-equiv="X-UA-Compatible" content="ie=edge" />
    <title>Document</title>
  </head>
  <body>
    <div class="container">
      <h1>Hi can you say hello World in any language?</h1>
    </div>
  </body>
</html>
Now, let’s add these files and folders to git and commit them for tracking of changes.
cd ../
git add .
git commit -m "I added a folder and two files to this project"N/B: Your commit message should describe the changes you have made to the repository to help project maintainers. I will elaborate more on this when we get to open source.
What is happening in this repository
Sometimes we don’t just know what is going on in our repo but we don’t have to worry because Git got us covered with these commands
git status
git log
Undoing changes in a repository
we can undo changes either before or after a commit.
Undoing changes before a commit
Now let’s add the data below to our countries.txt
Africa
America
Europe
Asia
Oops, we just made a mistake these are the names of continents and not countries. let’s check what is happening in our repo.
git statusLet’s undo this mistake with git.
git checkout -- countries.txt
cat countries.txt
that was for a specified file. If more than one file is changed, to undo all the changed files we will use the command below
git reset --hardUndoing changes after a commit
Suppose however that you have committed a change and now want to undo that change and revert to the previous version. Let’s repeat the same mistake we made earlier but this time we will get it committed. Add the data below to our countries.txt
Africa
America
Europe
Asia
git add .
git commit -m "I mistakenly added names of continents to countries.txt"To see all our committed changes, type the command below
git logThe git log command shows lines saying commit with some apparently random set of letters and numbers.
This is an identifier for a particular commit. We can use git revert with one of these identifiers to remove the change that happened in that commit.
Have you seen the random set of letters and numbers in the commits? In practice, you only need about the first 6 or 7 characters of the commit identifier to identify a particular commit uniquely.
git revert can be used to undo any commit
git revert abgd875We have been able to configure git on our local machine, create our own repository, make changes to our repository, and also undo some changes.
Understanding branching in Git
The concept of branching in git is broad and it would be better understood with a more practical approach.
But then it is good to understand what a branch is why we should ever create a branch and when to create a branch.
What is branching in Git
Branching in Git is a function that is used to create an independent, similar copy of the current repository for different usage requirements.
In other words, branching means diverging from whatever you have been doing to a new lane where you can continue working on something else without disturbing your main line of work.
It is widely used in bug fixing and in the addition of new features to an existing project.
Why is branching necessary in Git
To understand the why part, let’s consider a situation where you are working in a team where different people contribute to different pieces existing in your project.
Your entire team recently launched phase one of your project and is working towards phase two.
Unfortunately, an important feature was not implemented in phase one All of a sudden your priority shifts to implementing the feature first, thereby dropping whatever you’ve been doing for phase two and quickly implementing that feature in phase one.
To handle this kind of situation, you have the branching concept, which allows you to work on multiple things without obstructing the active branch (master branch).
When do you need a branch With Git, There are no strict rules on when you need to create a branch.
You can have your own technical or even organizational reasons to do so.
From my experience using git, I will suggest the following to give you an idea:
Most times, when building software, developers do try implementing a piece of logic in an existing codebase severally before it works.
During this experimental phase, the actual released version of the application should not be disturbed. In such a case, a branch is needed.
And the classic one is that few people in the team might be working on the bug fixes of the released version, whereas the others might be working on the next phase/release, branching is also very applicable in this case.
Branching is also very applicable in bug fixing.
Creating our first branch with Git
- Create a directory called Branching on your desktop.
- Create two files named
index.htmland style.css inside the Branching directory. - Add the following code into
index.html
<!DOCTYPE html>
<html lang="en">
  <head>
    <meta charset="UTF-8" />
    <meta name="viewport" content="width=device-width, initial-scale=1.0" />
    <meta http-equiv="X-UA-Compatible" content="ie=edge" />
    <link rel="stylesheet" href="./style.css" />
    <title>Experimenting git branch</title>
  </head>
  <body>
    <div class="container">
      <h1>Welcome to code school</h1>
    </div>
    <div class="container">
      <button class="btn-register">Register</button>
    </div>
  </body>
</html>
4. Add the following code into style.css
.container {
    display: flex;
    justify-content: center;
    align-content: center;
 }
.btn-register {
    color: white;
    border-radius: 5px;
    width: 80px;
    height: 30px;
    background-color: green;
 }
5. Save the files.
6. open the Branching folder via the terminal and initiate it as a Git repository.
7. add all the files, and make a commit as follows:
git init
git add .
git commit –m 'added initial project scaffold with the initial piece of code'
Boss: Hey work on the color of the heading it is so horrible to the sight.
You: Okay I will. What just happened? You were asked to fix a bug in the project.
- Create a new branch called
bug_fixesusing the following syntax:
git branch bug_fixes2. Enter the bug_fixes branch using the following syntax:
git checkout bug_fixes 3. Now open the style.css file and change the header color to green by adding the following syntax:
h1 {
color: green;
}
4. Let’s add the changes made in the style.css file and commit it.
git add .
git commit –m 'change the colour of the header in style.css'
5. Let’s check if this change has affected the master branch.
git checkout masterWhat do you notice? For me, the master branch is not affected.
6. Let’s add a login button to the container class of our index.html file as follow:
<div class="container">
  <button class="btn-register">Register</button>
  <button class="btn-register">Login</button>
</div>
7. Now we need to merge bug_fixes branch to the master branch with the following command.
git checkout bug_fixes
git merge master
git checkout master
Notice that the header color in the master branch is now green.
8. To view a list of branches available in the system, use the command
git branchWe can now create a branch and merge one branch with another.
How to synchronize your local repository with GitHub
To synchronize your local repository with GitHub, proceed as follows:
- Go to the GitHub official website and make sure you are logged in
- In the top right corner, you should find a + sign. Click this and then click New repository
- Enter the name of your repository (GitProject)
- Add a description of your repository — something like “My first git project”
- Click the button to create the repository.
These steps have created an empty repository on GitHub; you now need to synchronize your local repository with GitHub.
Replace USERNAME with your GitHub username in the following.
git remote add origin git@github.com:USERNAME/GitProject.git
git push -u origin master
N/B: If you make a mistake in this command (such as not using the correct username or repository name), you can delete the remote repository and start again with the command below.
git remote remove originFrom now on, after you make and commit changes, all you need to do is git push(without the -u origin master) to ‘push’ your changes onto GitHub.
This means you can continue your work from anywhere if you have access to a computer with Git and your application software installed on it.
Now let’s enter the second phase, where we would like to resume our work from a remote machine.
- Clone the repository from the server.
- git clone “repository link”.
- cd into the cloned repository.
- Make your changes to the files needed.
- Add/stage the modifications made in files, commit, and push.
- git add *
- git commit –m ‘Your commit message’
- git pull
- git push
Our changes are now on GitHub and we can access them remotely.
Adding multiple people to the same repository
One of the best ways for building software is by collaboration (i.e. working as a team).
This is one of the recommended skills in the software development industry.
Don’t worry I will make you good at this as you follow on.
Inviting users to your GitHub repository
Inviting your friend to access your Project so that he can assist you to implement some functionalities is easy with the steps as follows:
Ask for the username of the person you’re inviting as a collaborator.
If they don’t have a username yet, they can sign up for GitHub.
- On GitHub, navigate to the main page of the repository.
- Under your repository name, click Settings.
- In the left sidebar, click Collaborators.
- Under “Collaborators”, start typing the collaborator’s username.
- Synchronize our local repository with GitHub and we can work remotely on different machines as long as these machines have git running.
- Invite friends to join us in building our projects.
We can now Synchronize our local repository with GitHub and we can work remotely on different machines as long as these machines have git running.
Invite friends to join us in building your projects.
Understanding OpenSource
Opensource software is software in that the source code can be inspected, modified, and enhanced by anyone who wants to make a contribution to the software.
A typical example of OpenSource software is the Linux operating system which is built with the collective effort of various individuals’ contributions.
Linux has become so popular and powerful that most servers run with Linux.
Benefits of open source
- The common benefit of open source is the building of powerful and scalable software with the collective effort of various individuals as lots of employers look upon open source contribution as an added advantage.
- Open source is generally much more cost-effective.
- Open source gives enterprises the ability to attract better talent due to their flexibility and freedom.
Before we dive into open source, you should be exposed to these terms as they will be applicable when making contributions to some open source projects or packages.
For this module, I will contribute to my friend’s public repository. Don’t be nervous cos he is a very cool guy.
I will build a simple playground for us to have fun while learning.
Just follow the simple instruction to contribute to the playground.
Let’s get the ball rolling.
Forking a repository
In Git, Forking means splitting a repository into an identical copy and becoming the owner of a copy.
Be guided as forking is not a git command so there is nothing like “git fork”.
I know that was a bit hilarious. The fork is provided by GitHub.
How to fork a repository
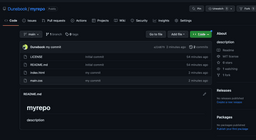
Simply get to the repository’s page and click the fork button to have an identical copy of the repository in your GitHub account.
See how I forked a repository to my GitHub account.
The next step is to clone the forked repository to your local machine.
I assume that we all have a basic understanding of HTML and CSS if not you can just follow on as I will build something very simple and easy.
Always remember to create a branch when working on a group project.
Change the directory into the cloned repo on your local machine.
Create a branch and checkout to it using the following command.
git checkout -b branch-nameAdd the following piece of code to the index.html file in the cloned repository
<!DOCTYPE html>
<html lang="en">
  <head>
    <meta charset="UTF-8" />
    <meta name="viewport" content="width=device-width, initial-scale=1.0" />
    <meta http-equiv="X-UA-Compatible" content="ie=edge" />
    <title>Document</title>
    <link rel="stylesheet" href="./flags/flags.css" />
    <link rel="stylesheet" href="./main.css" />
  </head>
  <body>
    <div class="container">
      <h1>Hi can you say hello World in any language?</h1>
      <ul class="list-group">
        <li class="list-group-item active">
          <i class="flag flag-us"></i> Hello World
        </li>
        <li class="list-group-item">
          <i class="flag flag-fr"></i> Bonjour le monde
        </li>
        <li class="list-group-item"><i class="flag flag-sp"></i> Hola Mundo</li>
        <li class="list-group-item"><i class="flag flag-gm"></i> Hallo Welt</li>
        <li class="list-group-item"><i class="flag flag-it"></i> Ciao mondo</li>
      </ul>
    </div>
  </body>
</html>
Now add the following piece of code to the main.css file in the cloned repository
h1 {
color: rgb(133, 186, 246);
text-align: center;
}
.list-group-item {
border: 1px solid gray;
background-color: transparent;
border-radius: 2px;
margin-top: 10px;
height: 40px;
font-size: 20px;
padding-left: 5px;
padding-top: 10px;
}
.list-group-item:hover {
cursor: pointer;
}
.list-group {
list-style-type: none;
}
.container {
padding-left: 20%;
padding-right: 20%;
margin-top: 30px;
}
.active {
background-color: rgb(133, 186, 246);
}
Add, commit, and push to your remote repository.
If we get to (reload) the original repository, we can find our commit.
Finally, we send a pull request and wait for it to be merged by the admin.

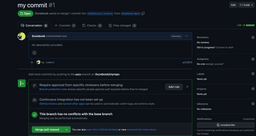
If we get to (reload) the original repository, we can find our merged changes.

Conclusion
Finally, we have come to the end of this article and I know you feel more confident to handle a remote project also contributing to open-source projects is no longer a nightmare or difficult task.
Feel free to contribute to as many open-source projects as you can in order to boost your portfolio, morale, and confidence.
Make sure you start contributing to a more friendly open-source project at first.
Also, ensure that you read the guidelines for an open-sourced project you wish to make your contributions.